Showing posts with label Winter Crafts. Show all posts

Monday, November 19, 2018

Family Fun: Winter Crafts and Activities


Now that the weather is getting colder, are you dreaming of hot chocolate by the fire and putting up the holly and ivy? Commercials advertising Christmas gifts are popping up on TV and the sounds of the holiday season can be heard earlier and earlier each year in the malls and stores. All of the Halloween and Thanksgiving items are going on clearance. Are you eagerly awaiting the first snowfall? 

Over the years I have shared our winter arts and crafts and activities at A Mom's Quest to Teach. In order to help find those posts, I am sharing them again in one convenient place – right here!

Do you have a favorite? Or does your family partake in their own fun winter activity? 


Winter Crafts 


Snowflake Sun Catcher 


Snowman Names 


Toddler's Christmas Felt Tree 


Snowman Milk Container Craft 


Do you have a favorite winter time craft or activity? 


Wednesday, January 17, 2018

Crafts: Christmas Tree Ornaments

text: Crafts: Christmas Tree Ornaments; two ornament cliparts

This post contains affiliate links. For more information, please see my Terms of Use and Disclosure Policy page. Thank you.


Each year, my children have been making ornaments as presents for their godparents and grandparents.  This year, we made Christmas Trees.

Materials 


Steps 

1. Gather all materials.


2. Distribute materials.  We have these trays that were perfect to hold the kids' pieces.


3. I let my children pick out a certain number of pieces to attach to their trees. 


4. Glue three Popsicle sticks together in a triangle/tree shape.


5. After the glue has dried, glue on your decorations.


6. After the glue dries for your decorations, attach strings to the back so you can hang your trees.  If you want them to look more like trees than ours turned out, don't forget to add the trunks!


Resources 

Fun Craft Kids' Popsicle Tree Ornaments 
One Little Project's Glittering Popsicle Stick Christmas Trees 
Frogs and Fairies' Popsicle Stick Christmas Tree Ornaments
Housing a Forest's Popsicle Stick Christmas Tree Magnet 


Friday, December 15, 2017

Crafts: D is for Door

Text: Crafts D is for Door; A Mom's Quest to Teach Logo

This post contains affiliate links. For more information, please see my Terms of Use and Disclosure Policy page. Thank you.

crafts with the letter D

My daughter is working on learning the letters of the alphabet so we have been completing a number of letter-themed crafts.  To go along with a holiday lesson, I created this door craft for her and her brother to complete.

Materials


Steps

1. Gather all materials.


2. If your child is proficient with scissors, they can cut out all the pieces themselves.  If not, cut out the letter D and a door.

3. Glue the letter D onto a piece of construction paper.


4.  Glue on the door.  Be sure to only glue a stripe onto the paper to create a hinge so the door can be opened and closed. Glue on the doorknob.  We recycled buttons for our door knobs.


5.  If you wish to decorate the craft for Christmas, add a wreath and other holiday decor.


6.  For a winter time D is for Door craft, add snowflake sequins.


If you create this craft with your child, I would love to see it.  You can share it on my Facebook page or tag it on Instagram with #momquesttoteach.  Thank you. 

Looking for more crafts from A Mom's Quest to Teach: 


Thursday, December 29, 2016

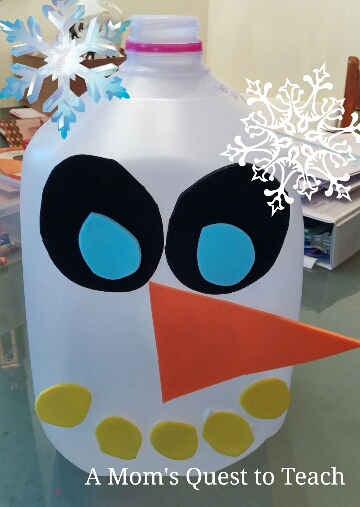
Crafts: Snowmen Milk Containers


This post contains affiliate links. For more information please see my Terms of Use and Disclosure Policy page. Thank you.

Materials 

  • milk container (plastic gallon or half gallon) 
  • craft foam 
  • scissors 
  • glue (I prefer to use a 'tacky' glue) 
  • lights (optional) 
snowmen on front step with lights

Steps 


1. Drink milk.

2. Wash out milk container and allow to completely dry.

3. Remove labels. (Sometimes it is easier to do this when the container is still wet.)

4. Create a template for eyes, a nose, and a mouth.

5. Cut pieces from foam.

6. Attach to milk container. 

Eyes on the snowman

gluing on the mouth of the snowman


completed snowman milk jug

Optional 


7. Cut out small hole on back near bottom for lights. 

cutting holes in milk containers for lights

8. String lights inside the snowman.

putting lights inside snowman milk jug


Safety Note: Be careful about leaving lights on inside your snowman to prevent any fires.


I made a few pieces to create a Frosty the Snowman and Mrs. Frosty for our front step.

To keep them in place, you could place rocks inside of them or tie them down.  I tied our three to the railing. 


Sunday, January 3, 2016

Crafts: Snowman Names

Snowmen crafts


This post contains affiliate links. For more information please see my Terms of Use and Disclosure Policy page. Thank you.

On New Year's Day, as a family we created our names as snowmen.  I saw the project shared on Facebook and thought it was perfect to create some winter adornments to leave up after the Christmas decorations are taken down.

We used bulletin board letters from the dollar store to trace our names and miscellaneous craft supplies to decorate the snowmen's faces and hats.

It was a very fun project and as my toddler walks by the closet, it has also turned into a learning opportunity as we read the letters and names together.

Materials 


Looking for more Holiday and Winter Posts? 


Resources 


Fun-A-Day's blog has some other examples (Snowmen Name Craft)

Other winter-themed crafts on my Pinterest (Winter Crafts)

Monday, December 21, 2015

Toddler's Christmas Felt Tree


Like many moms, I have discovered the joys and pitfalls of Pinterest. I quickly started creating many boards of all different topics including enough birthday party ideas for my two littles to last into their teens.

For now winter crafts and activities, specifically Christmas, has received a lot of attention as I am very determined to start doing more organized activities with my toddler as he gets older. After pinning everything from coloring pages to paper roll crafts, I stumbled across something I wanted to make him.  A Felt Christmas Tree.


I found several examples but the one I really liked was Vicki's from Nap Time Magic: Toddler Christmas Tree because it was movable. This was a key factor because I had to make sure that my toddler could play with it away from my 8 month old.

So far the tree has been a success with my guy. He has a set of felt ornaments I made specifically for the tree and some other felt animals and letters that were left from a cloth book project. Typical of any child, he is using the ornaments both on and off of the tree so it is getting twice the use which is great of any 'toy.'


Materials


  • 1 yard of green felt 
  • 1 tri-fold display board
  • felt of various colors (dependent on your ornament choices)
  • Emobordiary thread (if you wish to sew embellishments onto your ornaments)
  • Velcro with adhesive (Instead of gluing my tree to the display board, I use Velcro so that way I could create other felt scenes later.) 
  • general craft supplies (scissors, glue, needle, paper, etc) 

Our Tree 


Organizing the ornaments 


The star has to go on top.


Some Ornaments 


Christmas Felt Tree Ideas 

Winter Crafts

Ornament Ideas 

Felt Ornaments