Showing posts with label art for kids. Show all posts

Wednesday, September 25, 2024

Learning to Draw in Nature: A Review of The Nature Explorers Drawing Guide for Kids

A Mom's Quest to Teach: Learning to Draw in Nature: A Review of The Nature Explorers Drawing Guide for Kids; background of path in nature

I received a COMPLIMENTARY copy of this product from the Timberdoodle in exchange for my honest opinion. I was not required to write a positive review or be compensated in any other way. This post contains affiliate links. Please see my Terms of Use and Disclosure Policy page for more information. Thank you.

Would your children like to learn about drawing? Do you want to include nature journals in your homeschool routine? The Nature Explorers Drawing Guide for Kids is a great tool to help your children learn to draw most of the animals they will see during nature walks, and it presents fun and interesting facts about the animals, too. This paperback book is part of the 2024 Third-Grade Curriculum Kit from Timberdoodle. 

About the Book 

The Nature Explorers Drawing Guide for Kids presents step-by-step instructions for each animal presented to help your children get started. It provides: 

  • An introduction to nature exploration 
  • 40 step-by-step drawing instructions 
  • Drawing techniques and tips
  • 15 2-page nature journal pages 
A Mom's Quest to Teach logo; inside drawing instructions of The Nature Explorers Drawing Guide for Kids


This 128-page paperback book includes such animals and plants as: 

  • Fox
  • Moose
  • Robin
  • Seagull
  • Maple leaf
  • Saguaro Cactus
  • Bumble bee 
Each animal and plant featured has a one-page drawing instruction page and one page dedicated to a critter profile, observations you can make, and a tip.

A Mom's Quest to Teach: Learning to Draw in Nature: A Review of The Nature Explorers Drawing Guide for Kids; book cover


What Do We Think? 

I love the fact that the book does not start with two or three simple steps and then jumps to finishing up with a very complicated final drawing. The artist presents realistic expectations for the children (and parents who are drawing along with their children). 

I found the steps very simple to follow as did our 11-year-old son. Our 9-year-old daughter was a bit more picky because her drawings did not turn out the way she wanted them to. But the more nature walks we take, the better her drawings will be with practice. 

It is a great size! You can easily stow it away in a backpack or bag to take with you on your nature walks. We even took it with us on vacation.


A Mom's Quest to Teach logo; observe and draw your world; seaweed


I would highly recommend The Nature Explorers Drawing Guide for Kids to parents of children ages 6+ whether you homeschool or not!

Note to Christian Parents: There is a brief introduction to Charles Darwin as a naturalist. Nothing is mentioned about evolution in this description. 


Looking To Study More Art? 

Please check out my review of another great art-themed product from Timberdoodle: 

Tuesday, November 15, 2022

Crafts: God is Love Painting

 A Mom's Quest to Teach: Crafts: God is Love Painting  - background photo of brushes and paint

This post contains affiliate links. For more information, please see my Terms of Use and Disclosure Policy page. Thank you.


I had the pleasure of designing and creating several crafts for The Canadian Schoolhouse's Virtual Family Retreat: A Purposeful Life. This virtual family retreat is perfect for homeschoolers. The goal is to share about how to live a purposeful life so that you'll gain new insight into God’s plan for your family and your commitment to home education. And the best part? The whole family has a place in this retreat. There are special speakers addressing both homeschooling moms and dads, crafts for your children, and more. 

One of the most important things to remember is that God is Love. Our Father loves us and wants us to be with Him. So, how can we remind ourselves to be loving all the time? How can we be purposeful with our loving? Let's look at the focus quote from day one of the retreat from 1 John 4:7-8. 


"Beloved, let us love one another, for love is from God, and whoever loves has been born of God and knows God. Anyone who does not love does not know God, because God is love." 


Our children's youth program at church says: "Love God! Love Others! Nothing Else Matters!" While this is a very simplified look at what God calls us to do, it is one that is perfect for children. Everything that is important Biblically is tied up in loving God and loving others. If we don't love God, we won't know Him. We will struggle with loving others. 

Today, to help us remember God's love, we are going to create an art piece with paint, markers, painter's tape, and more! So, let's get our materials! 


Gather your materials! Paint, Paintbrushes, Painter's Tape, Paper with pencil and crayon background


Materials 


Steps 


1. After you get your paper, you will need to create the words using the Painter's Tape. You can make the words as small or as big as you want. They just need to fit on the page. If you are letting your children form the words, remind them to take their time as they shape the letters. You don't want white space to overlap the pieces of the tape. There are different ways to form the letters. So, don't be afraid to try different styles.

A Mom's Quest to Teach logo; God is Love created in painter's tape


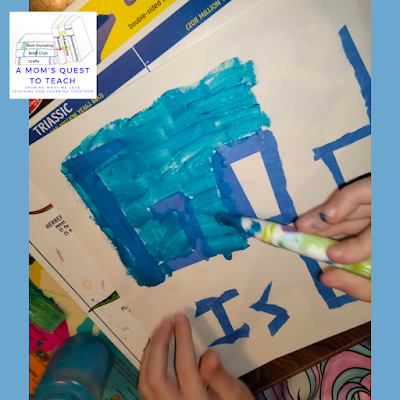
2. Next, paint over the letters. Paint all around them. You don't want to see the edges of the tape. Paint lightly on top of the letters. The harder you push on the letters with the paintbrush, the more difficult it will be to lift the tape. You can paint the whole page or just where the word is. 


A Mom's Quest to Teach logo; God is Love in painter's tape being painted blue


3. Use any color you want. Just maybe not blue, because it does make it hard to see where the paint begins when you need to peel away the painter's tape.

4. When finished, the tape will leave a wonderful white space behind. Your words will really stand out! 


A Mom's Quest to Teach logo: Crafts: God is Love Painting; God is Love with blue paint around it


Where do you think you will hang your finished art piece? 


Friday, October 14, 2022

Crafts: Bear Painting

A Mom's Quest to Teach logo: Crafts: Bear Painting; background photo of forest

This post contains affiliate links. For more information, please see my Terms of Use and Disclosure Policy page. Thank you.

Painting is a favorite pastime for our children. So, I like to find new and creative ways to allow them to paint. From using different materials as brushes like painting with leaves to using handprints, there are many fun ways to paint. We've also experimented with watercolors and using q-tips to paint, too! 

For this painting project, I wanted our children to focus on the background and not the animal they would include in the painting. So, we used a clipart drawing of a bear when the entire painting was completed and dry. 

Materials 


Steps 


1. Gather your materials. 


A Mom's Quest to Teach logo; paint, kwik stix paint, foam shapes, construction paper, paint brushes


2. Decide what color construction paper you and your children wish to use. Do you want to create a nighttime picture, a picture of a polar bear, or one in the forest? 

3. After choosing a piece of construction paper, pick what colors you want to use. Then start to paint your picture. 


two different paintings in progress with A Mom's Quest to Teach logo


4. After the picture dries, put on foam shapes and glue on your bear. 

5. Your picture is ready to hang! 


finished bear painting with A Mom's Quest to Teach logo


More Painting 


If you are getting ready to prepare for winter studies in your homeschool, I've shared a very cute book and a painting craft previously.  In Winter's Coming: A Story of Seasonal Change, your children will see numerous woodland animals. Pick one of the animals in the story and create a painting highlighting the change in the season.

Another fun way to incorporate painting into your homeschool lessons is to paint on a different medium. When we were reading Black Bird, Yellow Sun, we created a picture of the sun and a black bird using beans. After the beans were dry (we glued them on the paper), we painted the beans.


A Mom's Quest to Teach: Crafts: Bear Painting; half painted tree on forest photograph background


Looking for More Painting Lessons and Courses? 


Let's Do Art Outside! SchoolhouseTeachers.com course cover


Why not take a look at SchoolhouseTeachers.com? They offer over 400 courses, including many art courses. With so many schools limiting their electives, including art, homeschool families have the chance to explore art in a great number of ways. They can learn new techniques, study famous artists through history, and explore different mediums such as sculpture, painting, watercolor, and more. As I look through their course offerings, there are currently 19 art-related courses, including: 

  • A Century of Art
  • Achieving Art Success with ArtAchieve 
  • All About Art
  • Art & History: Interconnected 
  • Art: The Timeless Treasure 
  • Art Tips with Jan Bower
  • Digital Art and Product Designs for Small Business
  • Discovering Art History
  • Drawing in Pen and Ink
  • Drawing with Realism
  • Elementary Art 
  • Everyday Easels
  • Exploring the World of Art
  • Inkscape Online Adventure
  • Learning About Art
  • Let's Do Art Outside
  • Preschool: Arts, Crafts, & Music
  • Studio Art for Teens 


Thursday, September 8, 2022

Including Art in Your Homeschool: A Review of Inspired by Vincent Van Gogh

A Mom's Quest to Teach logo: Including Art in Your Homeschool: A Review of Inspired by Vincent Van Gogh; background copy of The Starry Night

I received a COMPLIMENTARY copy of this activity from the Timberdoodle in exchange for my honest opinion. I was not required to write a positive review, nor was I compensated in any other way. This post contains affiliate links. For more information, please see my Terms of Use and Disclosure Policy page. Thank you.

Our children love art – especially our seven-year-old daughter. She is always asking me if we can make a craft, paint, or sew. She loves expressing herself in art and music. But I don't always like the prep work and cleanup required. So, I love art kits like Inspired by Vincent Van Gogh because everything we need is in one package with minimal clean-up needed. 

Inspired by Vincent Van Gogh is part of the 2022 Sixth-Grade Curriculum Kit. The package states ages 5-99 which seems just about right. A young child may not create as intricate designs but they will still enjoy recreating Van Gogh's famous artwork. 

What is Inspired by Vincent Van Gogh? 

This is an art kit with four scratchboards produced by Djeco. It comes with a booklet and a wooden stylus for scratching away the top layer of the cards.

The four paintings that inspire the scratchboards that are included in the kit are (although my interpretation may be mistaken): 

  1. The Starry Night 
  2. Sunflowers 
  3. Fishing Boats at Sea
  4. The Large Plane Trees 
The Inspired by kit by Djeco is designed in France, so you will find the information and instructions printed in French, English, German, Spanish, and six other languages. I've found most Djeco products are self-explanatory, though. You can figure them out without too much written instruction. 


A Mom's Quest to Teach logo: Including Art in Your Homeschool: A Review of Inspired by Vincent Van Gogh; partially completed tree art work


Ideas for Using Inspired by Vincent Van Gogh in Your Homeschool 


Read about Vincent Van Gogh prior to starting your artwork. Look at the four paintings used for inspiration and others to look for themes, favorite subjects, and colors. Just keep in mind that Van Gogh led a troubled life where money problems plagued him, and he ultimately committed suicide. You will want to preview any materials regarding his life before you share them with your children. 

After recreating the paintings using the scratch cards and stylus, ask your children if they recreate these paintings or others by Van Gogh with other mediums. Take out your paints, watercolor pencils, or even crayons to get creative. 

Finally, go on a field trip. There are many museums that have Van Gogh paintings on display. If you do not live near one of them, visit the website for the Van Gogh Museum in Amsterdam to view his works of art and learn more about the artist. (They even have a spot labeled for children, but I would still preview it before sharing it with your own children.)


A Mom's Quest to Teach logo; working on a Van Gogh inspired artwork


Our Thoughts 


I really like that there is no wrong way to produce the art on the scratch cards. You can leave as little or as much blue as you wish. Or you can reveal lots of the colors underneath as you create your own work of art. 

It all fits neatly in the envelope. It is easy to put away in between working on the pictures. As a family that has a lot of homeschool materials and resources, I value resources that are neat and tidy to put away for storage. 

It would be great if there was more than one stylus as both my children would like to work on their pictures at the same time. But having one leads to our practicing our patience. 

Our nine-year-old son stays it "helps you make art" and is a "guideline for making art." He noted that you can add things. He added his own boat to his boat picture and a letter M on the sail. Our seven-year-old daughter enjoyed working on the trees card together with me. She said Inspired by Vincent Van Gogh is "good for kids." She liked that they showed you examples so you could draw similar pictures yourself. 

I would recommend Inspired by Vincent Van Gogh to families who wish to include art in their homeschool days in a unique way. The lessons about Van Gogh and the completion of the scratch cards can take as long or as short as you wish. This provides you with great flexibility and is a good fit for the 2022 Sixth-Grade Timberdoodle Curriculum Kit.


Completed scratch board art work inspired by Van Gogh


Looking for more Unique Products from Timberdoodle? 


Read my review of Tenzi here: Dice, Decks, and Boards: Tenzi Game and Tenzi Card Deck
Read my review of a fun crystal art kit here: Art in Our Homeschool: A Review of Tiger Crystal Art Card Kit

Monday, June 27, 2022

Art in Our Homeschool: A Review of Tiger Crystal Art Card Kit

 A Mom's Quest to Teach logo: Art in Our Homeschool: A Review of Tiger Crystal Art Card Kit; tiger print background

I received a COMPLIMENTARY copy of this Card Kit from Timberdoodle in exchange for my honest opinion. I was not required to write a positive review, nor was I compensated in any other way. This post contains affiliate links. For more information, please see my Terms of Use and Disclosure Policy page. Thank you.


Do you have one of those subjects in your homeschool that sometimes gets neglected? For us, it is often art. While our children love arts and crafts, I often save those projects for another day because we run out of time, need to gather materials, etc. Knowing how important the arts are to developing various skills, I was very pleased to review the Tiger Crystal Art Card Kit from Timberdoodle with our two children. The Kit is included in the 2022 Fourth-Grade Curriculum Kit from Timberdoodle which I think is a perfect fit. 

What is the Tiger Crystal Art Card Kit? 

This self-contained art kit includes all the components one needs to create a beautiful work of art. In our case, the card kit depicted a tiger. The company does have other kits available including a lion, kittens, owl, horse, and others. 

In the kit we found: 

  • 1 Card 
  • 1 Envelope 
  • Bags of Crystals 
  • Empty Plastic Resealable Bags 
  • 1 Crystal Pick-Up Pen 
  • Jelly Wax
  • Tray 
The card is covered with a plastic piece as the card itself is sticky so you can place the crystals. The instructions are located on the inside of the kit package and written in English, German, French, and Dutch. So, in addition to incorporating art into your homeschool, you can try out your language skills by comparing the instructions. 

Crystal card kit unopened package, crystals in bags; putting crystals on tiger


How Did We Use the Tiger Crystal Art Card Kit? 


When it first arrived, our daughter was very excited to get started. She loves arts and crafts so this was perfect for her. After opening it, I was apprehensive that she would be able to complete it as she only turned seven and it is included in the Fourth-Grade Curriculum Kit. It looked like it would take great concentration to complete this kit. Would our daughter and our son have the patience to work on it? 

The first day I set aside time to work on the Tiger Crystal Art Card Kit, I let our children pick which color we would complete first. We opened the appropriate bag of crystals, poured them into the tray, put the Jelly Wax near the tray, and started working. I began the process to show our children how to use the Pick Up Pen (or stylus). Our daughter quickly wanted to try it on her own. I held the plastic piece up off the card so she could apply the crystals. 

Between the three of us, we completed that first color over the course of the day. I would work on it for a little bit and then go back to work or homeschool one of our children. Our daughter would work on it for a time while her brother and I were working on spelling or language arts. Our son would then work on it after he completed his other homeschool assignments. We continued this process for several days. I even left it out so they could work on it throughout the whole day and evening. And there were quite a few nights I worked on the Tiger Crystal Art Card Kit on my own as I found it relaxing. 


crystals in tray with pick up pen; working on tiger art picture


How Do You Complete the Picture? 


Choose which area of the card you want to work on and then look at the letter on the card. Find the bag of crystals labelled with that letter and pour them into your tray. Use the Pick Up Pen, after dabbing it into the Jelly Wax, to pick up the crystals. The crystals are attached to the dots labelled with the letter you chose. Don't remove the entire plastic piece until you are completed to protect the sticky parts of the card. 

When you are done with a specific letter, put that in a small plastic resealable bag and label it. You may notice you missed a few spots like we did and need to go back and fill them in later. 


A Mom's Quest to Teach logo: Art in Our Homeschool: A Review of Tiger Crystal Art Card Kit; tiger art on tiger print background


What Did We Think? 


At first, I was very concerned that our children would not be able to complete the project. It seemed to require great patience and hand-eye coordination. Would this work? I really thought that I would have to complete the entire card on my own but thankfully I was wrong. Our children enjoyed the process and seeing the card transform into a sparkly picture with the crystals. This simple card kit really brought art in our homeschool to life! 

What about the process? Was it easy to transfer the tiny crystals to the sticky card? Yes and no. If the crystals were the right side up, one could easily use the Pick Up Pen to transfer them if you had enough Jelly Wax on the Pen. Sometimes the crystals would fall off during the transfer but that wasn't that often. And we did have to gently shake the tray to flip the crystals over so we could pick them up the right way.  Once you get into a rhythm, it is quite easy to fill the entire card with the color you are working on at that time. 

We did notice that we had some duplicate bags of colors and one letter had two different bags of crystals. This wasn't too confusing and it did not impact our picture at all. 

I really enjoyed working on the Tiger Crystal Art Card Kit. I found it relaxing and enjoyable. While our soon-to-be fourth grade son enjoyed this homeschool art project, our daughter really liked it. So I would definitely recommend it for your daughters who love arts and crafts. If they have good dexterity and patience, then a child as young as seven might be able to complete this with a little help. 

Our daughter shared, "Though hard at first, it was actually easy once you got used to using the pen to grab the crystals and putting them on the card." She said it was a lot of fun. Our son said it was an "epic experience." 

This kit really brought art in our homeschool to life! Both our son and our daughter recommend it for your homeschool. 

A Mom's Quest to Teach logo; completed tiger art picture


Wednesday, June 3, 2020

Studying the Art of the Middle Ages: A Review of Artistic Pursuits Inc.

text: Studying the Art of the Middle Ages: A Review of Artistic Pursuits Inc.; logo of A Mom's Quest to Teach

Disclaimer: I received a FREE copy of this product through the HOMESCHOOL REVIEW CREW in exchange for my honest review. I was not required to write a positive review nor was I compensated in any other way.

Like most homeschooling families, our family enjoys incorporating art into our other subjects. Artistic Pursuits Inc. makes that very easy to do with their four-year course for kindergarten and elementary students. It takes children through history as they produce a variety of works of art. In the first volume, students work on building their visual vocabulary (read our review here: Building Visual Vocabulary). Then you can either complete the volumes in chronological order or pick and choose which ones interest you and your children. We have reviewed both volumes 1 and 2 (Art of the Ancient review) so we decided to pick Art of the Middle Ages which is volume 3 to review this time.

book cover of Art of the Middle Ages

Text: Studying the Art of the Middle Ages: A Review of Artistic Pursuits Inc.; Your children take a sequential trip through the history of art in a done-for-you program; photo of four art projectsOur children love learning about anything relating to knights and castles so this book was an excellent choice for our family to review! There are 18 lessons which cover a variety of art techniques. There is a combination of text lessons and video lessons to teach your children how to produce different artworks. No matter which type of lesson you are using, all of the materials are listed in the book.

The video lessons provide some background historical information presented by video host Ariel Holcomb. The video lesson then presents the art project and instructs how to complete the art project, step by step. You can choose to view the video lessons in order or select from the main screens. When the video lesson demonstrates how to create the art project, you will be watching an over the shoulder viewpoint as the art teacher, Brenda Ellis, works.

image from video lesson for making the crown with weaving

video screenshot of finishing the weaving using straws and yarn


The text lessons vary in that they sometimes provide prep notes (which can be helpful if you are teaching the lessons to a large group of children outside a classroom setting). There is then historical information given and questions to answer such as "Can you name the bold colors used by the artist?" in the Christ in Majesty tapestry. After viewing real-world examples, the steps are laid out for how you and your children can create the art project yourselves. Photos of the work in progress are included as well as a photo of a finished product by a child.

text of historical information re: Gothic stained glass
Here you can see the historical information (surrounded by the tissue paper we used).

How Did We Use Art of the Middle Ages in Our Homeschool?


While we could very easily have used this alongside a history curriculum focusing upon the Middle Ages or a literature curriculum in which we read about the kings and courts of the past, I choose to work through the projects with our children based upon what materials we had and which ones they wanted to try out.

We completed the following projects:

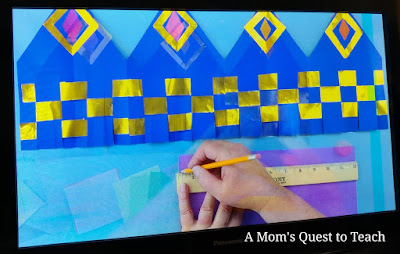
  • Paper Loom Weave: The kids completed both a basic weave and then the crown. I love that our children could complete this project more than once if they wanted to weave using different colors.  
paper loom weave with construction paper
crown woven with construction paper

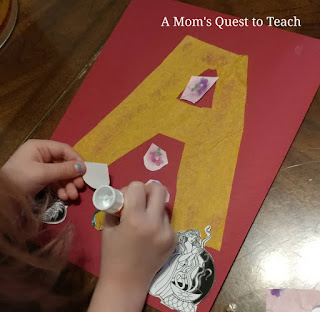
  • Art in Monasteries – Medieval Illumination: We used clip art and scrap paper rather than having our children draw pictures to add to their large letters. They also decided to choose letters based upon their gaming characters. 
Letter A illuminated manuscript craft

Letter D illuminated manuscript craft

  • Art in Basilicas – Byzantine Mosaics: This fit in perfectly as we had been watching a program that shared the mosaics in the Christian churches like the Hagia Sophia. 
mosaic art craft

  • Straw Loom Weave: I think I had more fun with this project than the kids. Maybe in a few years when they are older, they will want to try again. They had trouble with moving the yarn over and under the straws so our older son and I helped them complete their project. 
weaving using yarn and straws

completed yarn art project

  • Low-Relief: Our children had so much fun creating their own modified versions of shields. We used animals from the ocean as it is almost summer and then used modified materials. This project encouraged our son to want to read more about heraldry and what all the colors and symbols stood for in the Middle Ages. 
low-relief instructions and project in the middle of completion

  • Art in Windows: Gothic Glass was a very fun project as the kids got to pick and choose different color tissue paper to create the glass effect. 
faux stained glass art project


I used the lessons from the Art of the Middle Ages as fun homeschooling lessons. We often like to incorporate arts and crafts into our week so these were perfect. I could share a bit of history about the topic with our children. We either watched the video lesson where historical information was shared or we read the text and answered the questions together. Then our children could have fun creating their art.

My Thoughts


I love that the book is hardcover with full-color, glossy pages. The quality of the book is fantastic and will be able to last through much referencing. There is also space to keep the discs in the front of the book.

I would love it if the video lessons had more detailed instructions that were either printed in the book or you could download. I like to read and re-read instructions rather than just listen or watch instructions. That is my personal learning style. So when we were watching the video lesson, I wrote down notes to reference for when we would be working on the projects. (I also had trouble playing the discs. We ended up having to play the Blu-ray disc in our gaming console as it would not work in the Blu-ray player. I also could not get the DVD disc to work.)

I like that you have the option to purchase the materials directly from Artistic Pursuits Inc. (with or without the book). However, you can make substitutions if necessary and your projects will be okay. For example, I thought we had Gesso which is one of the materials for the Low-Relief project but we didn't. So the kids painted the shield with white paint and then they painted the sections and the animal with regular paint. The shields still turned out really cool.

steps of completing a low-relief shield

I would recommend the K-3 books from Artistic Pursuits Inc. as they are well made and provide many great art activities for your children. I love the incorporation of art history which I feel makes the curriculum even more versatile. I also like that we can go back and use the lessons again as our children grow more skilled and create new artwork.


Do You Want to Learn More?


Artistic Pursuits Logo


Website – Facebook – Twitter – Instagram

Artistic Pursuits Inc. offers a great variety of curriculum for your homeschooling needs. Members of the Homeschool Review Crew had the opportunity to review items for PK-12 grades, so be sure to check out their reviews!

Do you have an artist taking their first steps? There is a 16-week summer series where children can learn to draw from observation. Check out the blog here: The Artist's First Steps.

If you are interested in the K-3 level books (like those we have reviewed previously), then perhaps you might want to take a look at the online courses. For example, for the Art of the Middle Ages, you will receive 18 lessons online which is perfect for international homeschooling families.  


Homeschool Review Crew click through to read more reviews

Thursday, July 11, 2019

Virtual Refrigerator Art Link Up


This post contains affiliate links. For more information, please see my Terms of Use and Disclosure Policy page. Thank you.

Who loves stickers? Who loves sticker books? Stickers and sticker books seem to be a favorite among children of all ages and since there is such a great variety out there it is easy to find something they might just fall in love with.


Sticker Albums 


I can fondly remember my two sticker albums from when I was a kid. My mom gave me two photo books in which to keep my stickers (And I also had movie ticket stubs in them as well as a few postcards from my early vacations. I guess you could say this was the start of my scrapbooking hobby.) I think my favorite stickers from my childhood were the "My Little Pony" stickers that came with each pony. Those had a special place reserved on my Fischer Price record player.

Our younger children have two composition notebooks in which they can put stickers. Our younger son is also allowed to put his stickers in a 3-ring binder that has plastic sleeves in it with schooling papers. They put the stickers they receive from the local library or their doctors' office in their notebooks or the ones they receive for holidays or birthdays.


Sticker Books 


Our son recently received The Lego Batman Movie Ultimate Sticker Collection book for his birthday. The book has about 30 pages on which you use specific stickers to examine the heroes, villains, vehicles, and places in Gotham. There are also tons of extra stickers so your child can create their own scenes with Batman saving the day. He has been reading or playing with it every day since he received it.


You can also pick up sticker activity books at the dollar store like we have for our daughter. She has one that focuses on animals but there are number-themed and alphabet-themed ones, too.


And don't forget the sticker books that let you place and replace the stickers over and over to create fun scenes. Both of our younger children have had several of those over the years.

According to our son, all the villains but the Penguin were captured.

The Penguin was captured later. He escaped from the police car and Batman and Batgirl had to re-capture him.

Using Stickers to Create Art 


I love that stickers let children tell complicated stories that they might not be able to illustrate on their own, depending upon their skill. So, even though our six-year-old can not draw elaborate pictures with Batman fighting the Joker, he can use stickers to help tell his story.

And using miscellaneous stories lets our children make up fun and unique tales.


Do have art to share this week? 


You are invited to the Inlinkz link party!
Click here to enter