Wednesday, October 11, 2017

Halloween Craft: Spiders!

text: Halloween Crafts: Spiders; A Mom's Quest to Teach; painting of spiders


This post contains affiliate links. For more information please see my Terms of Use and Disclosure Policy page. Thank you.

My littles love to paint so when I saw this idea, I knew that they would enjoy creating their own spiders.

Materials 
  • clean toilet paper roll
  • black, washable paint
  • googly eyes
  • paper 
  • glue 
Steps 
1. Gather materials.

2. Cut toilet paper roll to create spider's legs.

3. Use toiler paper roll as a stamp to create spiders on the white paper.


4. Allow to dry.

5. Glue on googly eyes.  I let my littles tell me how many eyes they wanted.


6. Allow to dry.

7. Display for Halloween.


Resources 

Need some more ideas?  

Crafty Morning's Toiler Paper Roll Spiders 
Sweet Rose Studio's Paper Fan Spider 
I Heart Crafty Things' Paper Plate Spiders 
Sweet Rose Studio's Halloween Craft List 


Tuesday, October 10, 2017

Crafts: Pole Arms and Stained Glass Windows


This post contains affiliate links. For more information please see my Terms of Use and Disclosure Policy page. Thank you.

For my stepson's 15th birthday, we hosted a Swords and Wizardry Light-themed party. In addition to purchasing items to decorate our house, I also made several decorations with the help of my husband and daughter.

Trident and Pole Ax


Using old cardboard from my teen's dresser, I traced and cut out shapes to make a dagger, pole ax, trident, and shield.

I used old paints of varying shades of gray and black as well as some silver paint to add depth.

This project took several hours over the course of multiple days as I waited for the paint to dry so I could add another coat.

pieces needed for trident and pole ax
Pieces ready for paint

Painting process

Stained Glass Windows 


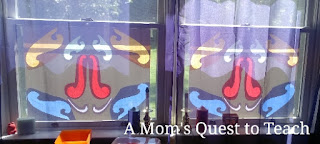
After researching a variety of DIY stained glass crafts on Pinterest, I decided to modify how we would make our own for the kitchen. We purchased two pieces of poster board and using stencils, I traced some shapes which my husband cut out.

Designed, traced, and waiting to be cut by my husband.

I used recycled tissue paper from previous birthdays and holidays to create the coloring glass effect.

My daughter helped choose the colors. 


I would recommend cutting the tissue paper to closely match the shape of the design.  It will help give it a more polished look.

This project took several hours to complete from tracing, cutting out the shapes, and cutting and gluing the tissue paper.

If I were to do this project again, I would use black poster board to prevent seeing the shape of the tissue paper when the poster board is hung in the window.  I would also use two pieces of poster board for each 'window' so that the tissue paper is in between them for durability.


Sunday, October 8, 2017

Introduction to Science: Small World Sensory Science Lesson: Construction


SchoolhouseTeachers.com is a site that offers a wide variety of courses (over 300!) to meet your homeschooling needs. From preschool to high school, the SchoolhouseTeachers.com site can help parents and students learn about such subjects as the American Revolution, Shakespeare, Algebra, and French.

With more than 30 science classes to choose from, your kids can find TONS of way to get into science! From All About Animals and Bug Science to Science Experiments and Wondrous Weather, we have science for all ages. Who knows? You might discover they want to try all the science classes. Don’t worry if they do—ONE membership to SchoolhouseTeachers.com includes ALL of them!

My two littles and I are using the Small World Sensory Science Lessons to learn more about the world around us. Working with sensory bins and activities involving beans, oats, pom-poms, rice, and other sensory materials, we will be exploring such topics as farms, oceans, and ponds.

Using the lesson on Construction, we explored digging and building with trucks, cars, and beans, painting with tire tracks, and sweeping up our mess of lentils and beans.

Kitchen table set up for exploration. 

I put out a variety of beans on different sized trays and plates and provided them with some toy vehicles and plastic lids and caps to scoop up the beans. My daughter was content for a while just placing the beans in the front end loader as well as picking up any of the beans that fell onto the floor.

Cars and beans ready for exploration


We also practiced sweeping with a broom and dust pan since my 4 year old accidentally knocked over the plate of lentils.  


My daughter remarked on more than one occasion how 'shiny' the beans were as she played with them. When we were all done, we poured all the beans into a big plastic container for future lessons.  

Having the foil down on the tray, made for very easy clean up.  I would highly recommend this method. In the future, we will do some of the other activities suggested in the lesson and read books about construction vehicles.  

Become a member of SchoolhouseTeachers.com and see all that Small World Sensory Science Lessons have to offer for your preschooler. 

Note:  I am an affiliate of SchoolhouseTeachers.com and receive compensation for new members.  This post contains affiliate links. Thank you.


Thursday, October 5, 2017

Trips: Washington Crossing Trip

text: Road Trips: A Mom's Quest to Teach; Washington Crossing State Park; logo of A Mom's Quest to Teach; house


We visited Washington Crossing State Park in New Jersey twice this spring/summer.  As a history major in college, I love visiting historical places and as a former zoo employee, I also love visiting nature parks.  Washington Crossing State Park provides a bit of both history and nature for visitors.


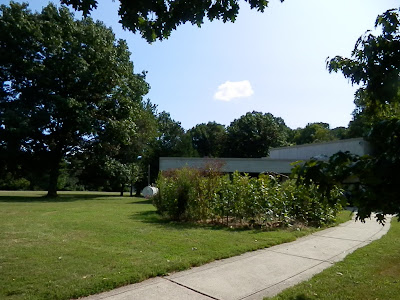
The Visitor Center has ample parking, beautiful lawns and trees surrounding it, and a nearby picnic area.  Inside we were able to explore two areas with American Revolution Era artifacts including weapons and clothing.


Visitor Center at Washington Crossing State Park
Visitor's Center

On our second visit, we arrived just before their musket demonstration ended.  Everyone in my family enjoyed getting to see (and hear) the firing of the musket.


Musket Demonstration

Johnson Ferry House  


A short drive from the Visitor Center is the Ferry House which is open to the public and furnished with period furniture.  It was probably used by General George Washington after the December 25, 1776 crossing of the Delaware River.


John Ferry House

John Ferry House


Grinding corn
In the kitchen, they had a mortar and pestle set up to grind corn.
Fruit, Veggies, and Flowers from the Garden
A selection of flowers, fruits, and vegetables from the kitchen garden.

Bedroom at John Ferry House
Bedroom upstairs

Bedroom at John Ferry House
Bedroom upstairs

Garden at John Ferry House
Kitchen Garden 

Nature Center 

Washington Crossing State Park is also home to a Nature Center which houses a variety of natural artifacts including different animal skulls to examine and touch, turtle shells, stuffed birds, and nests, among other items.  There is also a section with puzzles, books, coloring sheets, and live animals.

Deer outside Nature Center
There was a deer outside the Nature Center.  We were able to see it out the window before it returned to the woods.

Bee Hive
Bee's hive set up. 

Display at Nature Center
Exhibits showing the seasons and natural artifacts that can be found in the area.

There were several animals including a corn snake and several different aquatic turtles.


Turtle


Felt Puzzle
Felt puzzle 
Insect puzzle
Completing a puzzle of insects 

Putting together insect puzzle


We saw several different birds on each of our visits to the Nature Center.

Bird outside Nature Center


Goldfinch
There are several different bird feeders outside the front of the Nature Center. 


Park 

There are also two playground areas with swings and climbing areas for the children.  We spent time playing there on both visits.

Playground


Washington Crossing State Park in New Jersey is a great place to visit with the family. We brought our lunch on both visits, picnicking near the river, and toured the Park itself after lunch. For individuals who like to hike, there are also numerous trails of varying difficulty with abundant wildlife. 


Interested in learning more about Washington or the Colonial America? 


Wednesday, September 27, 2017

Recommended School Supplies: What do you need in your desk?


This post contains affiliate links. For more information please see my Terms of Use and Disclosure Policy page. Thank you.

Being prepared is one of the keys to getting a good education. Every teacher – whether your attend public or private school or you are homeschooled –  has different requirements and expectations for their students. There are some basics that you should always have during your career as a student whether you are in elementary school, high school, college, or are homeschooled.

Items for Home or your Desk


  • tape dispenser
  • stapler
  • three hole punch
  • extra 3-ring binder
  • glue 
  • glue sticks
  • crayons, colored pencils, markers 
  • scissors 
  • pencil sharpener 
  • index cards 


Items to Carry or Keep Close at Hand


Different Note-taking Materials 


3-Ringer Binder


These are fantastic for using with a course with multiple handouts that you need to keep organized by unit or chapter.

One Subject Notebook


This type of notebook is good for those courses where most of the work will be completed in one place.

Three or Five Subject Notebook


This type of notebook is good for those courses where you will be taking a lot of notes or need to divide up individual courses into one notebook.

Tablet or Laptop


Using an electric device is great because you can organize notes, digital handouts, websites, and other materials provided immediately.


What are your favorite school supplies? Do you find you retain information better when you use a particular note-taking method?